Categories
Hardware Gadgets

Atreus – Keyboard

I wish we hadn’t used all the keys on the keyboard.

Bill Joy

The Atreus is about a reduced set of keys.

I’ve been using the Atreus keyboard for three years. Three years! Time flies. I want to get around to posting something about this keyboard for a while now; I finally got around to write something.

Back in 2020 I kickstartered the Atreus keyboard. At the beginning of October 2020 I held it in my hands and was able to try it out first time.

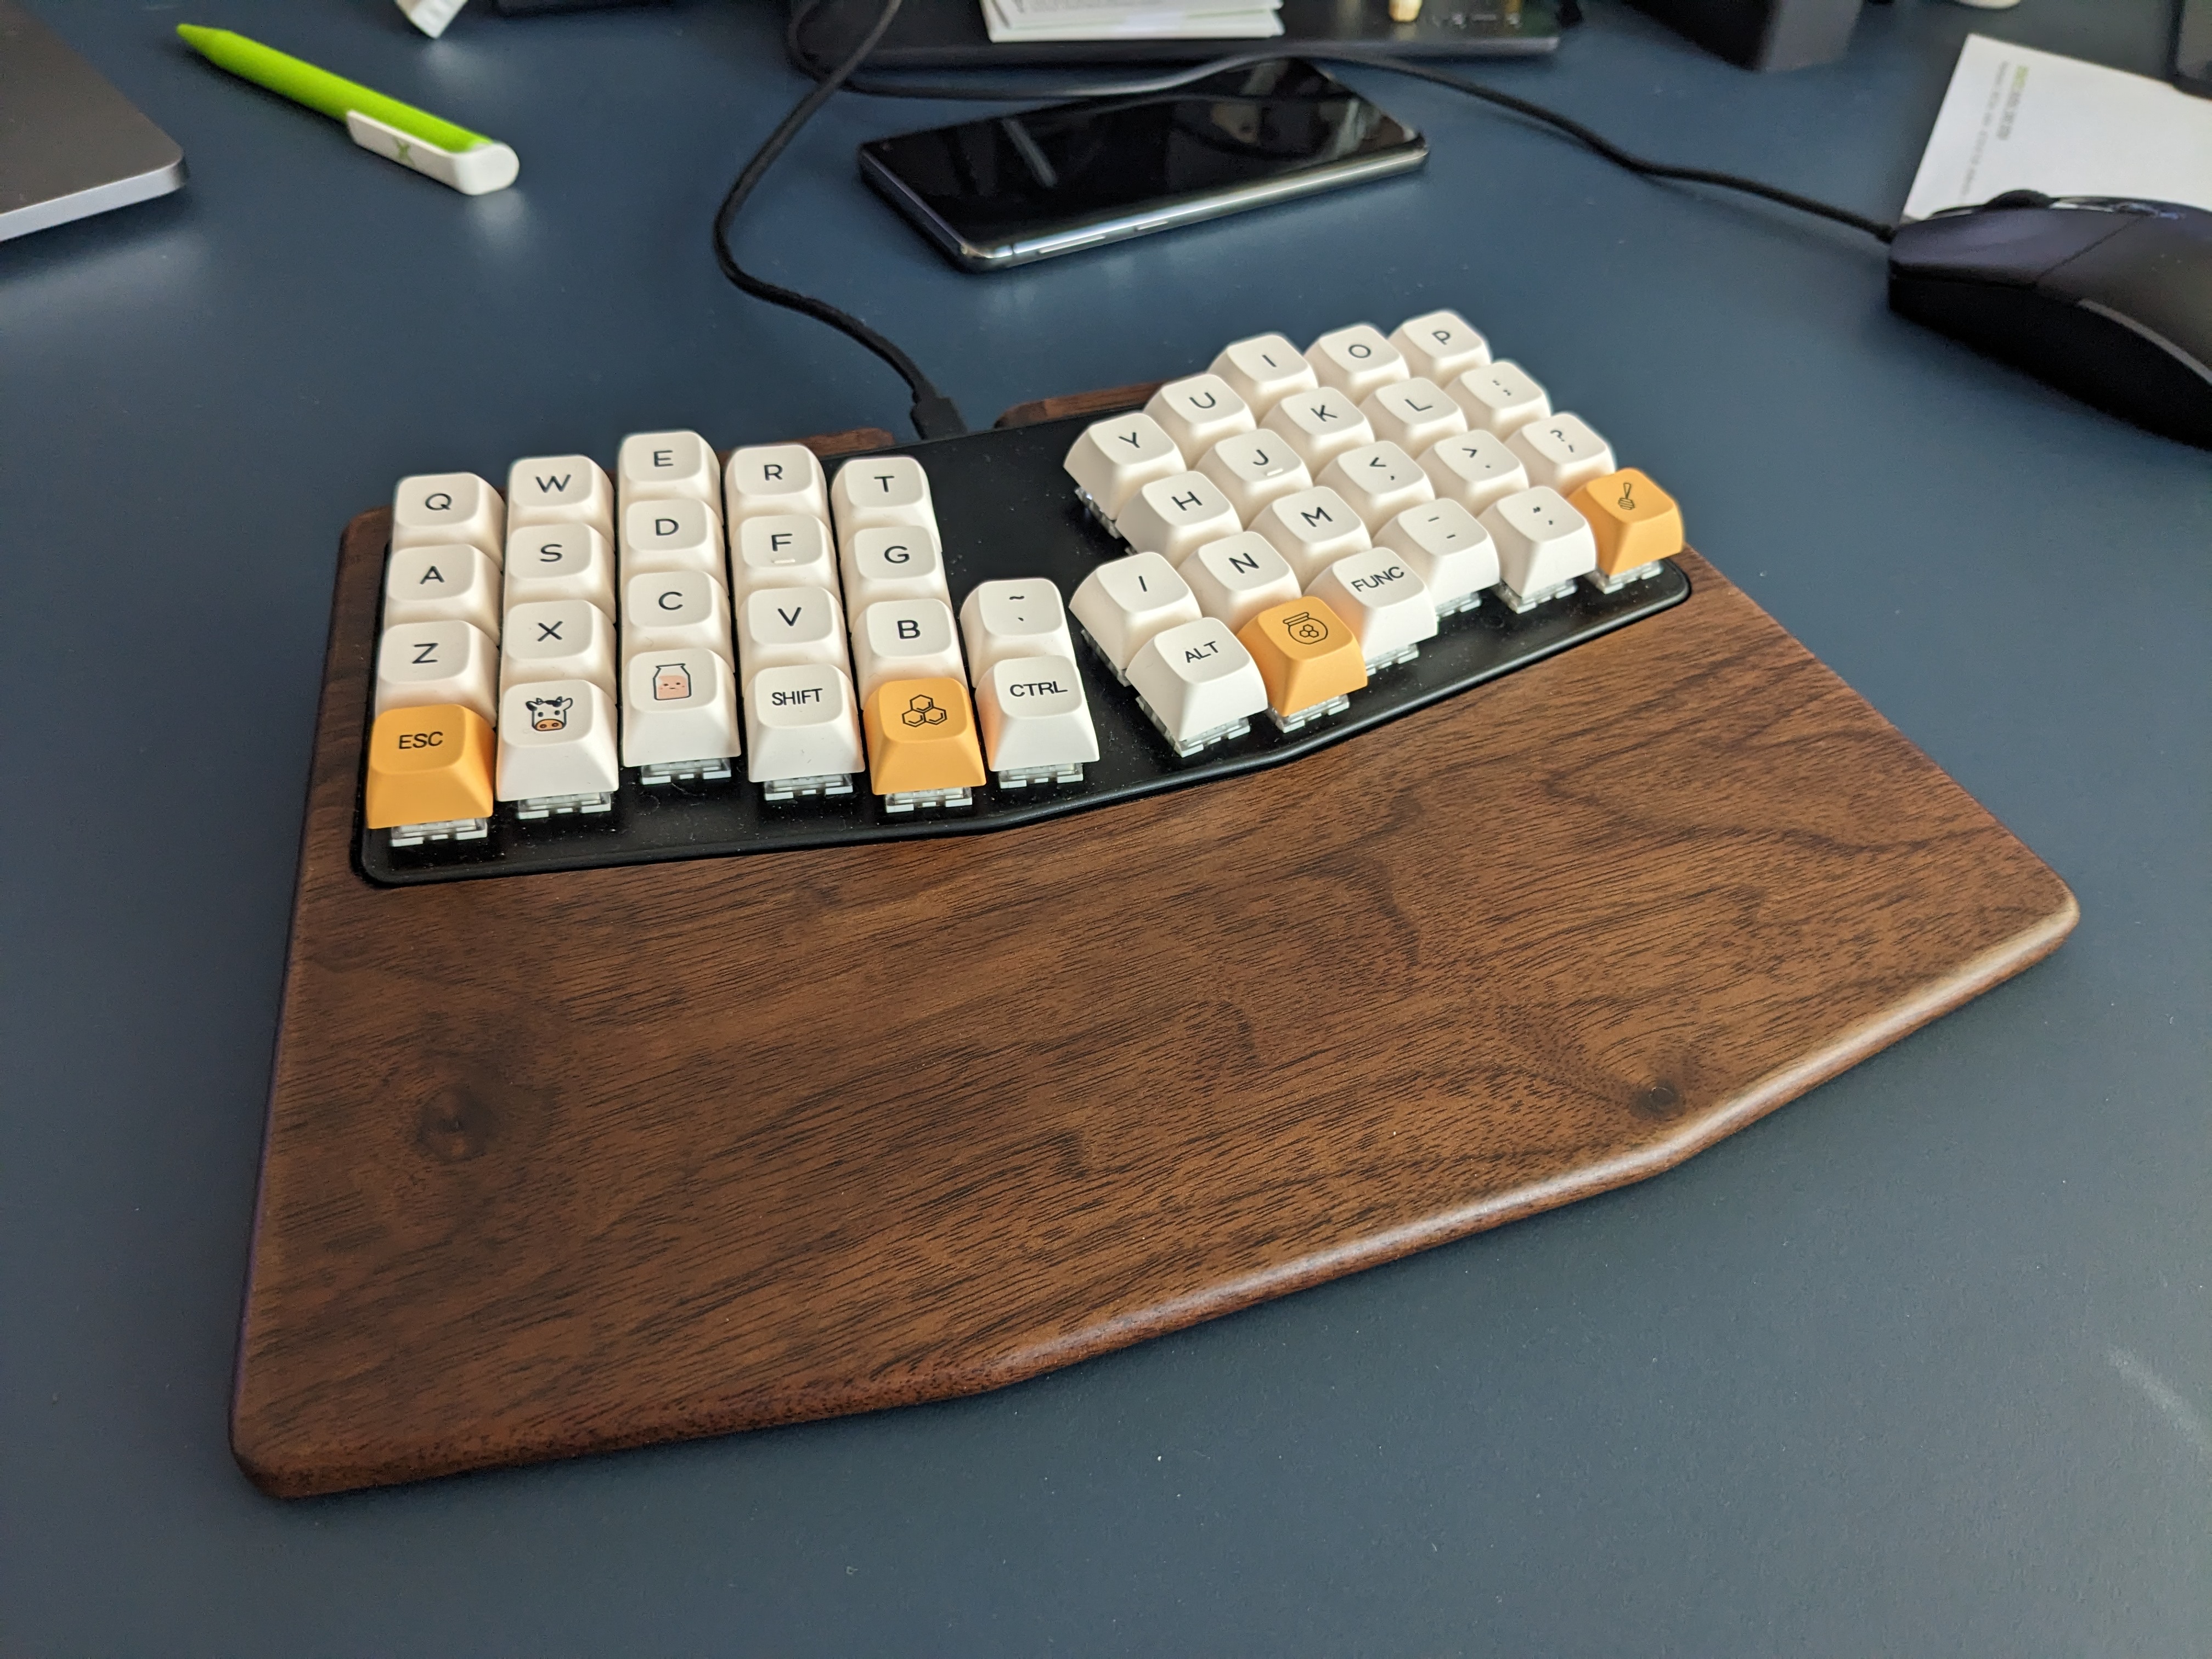
The Atreus is a small form factor 40% split keyboard keyboard. The original design by Phil Hagelberg had 42 keys and is open source hardware. The kickstarter project was a collaboration between Phil Hagelberg and keyboard.io which features 44 keys. It is also open source hardware and is freely programmable with open source software. Now the keyboard is offered in the online shop of keyboard.io. Keyboard.io offers great and easy to use configuring software called Chrysalis (also open source). It’s easy to start and configure your keyboard to your needs. Advanced users can even flash their own firmware. Which is needed for advanced concepts like tap dance.

Atreus – keyboard.io version; 44 keys.

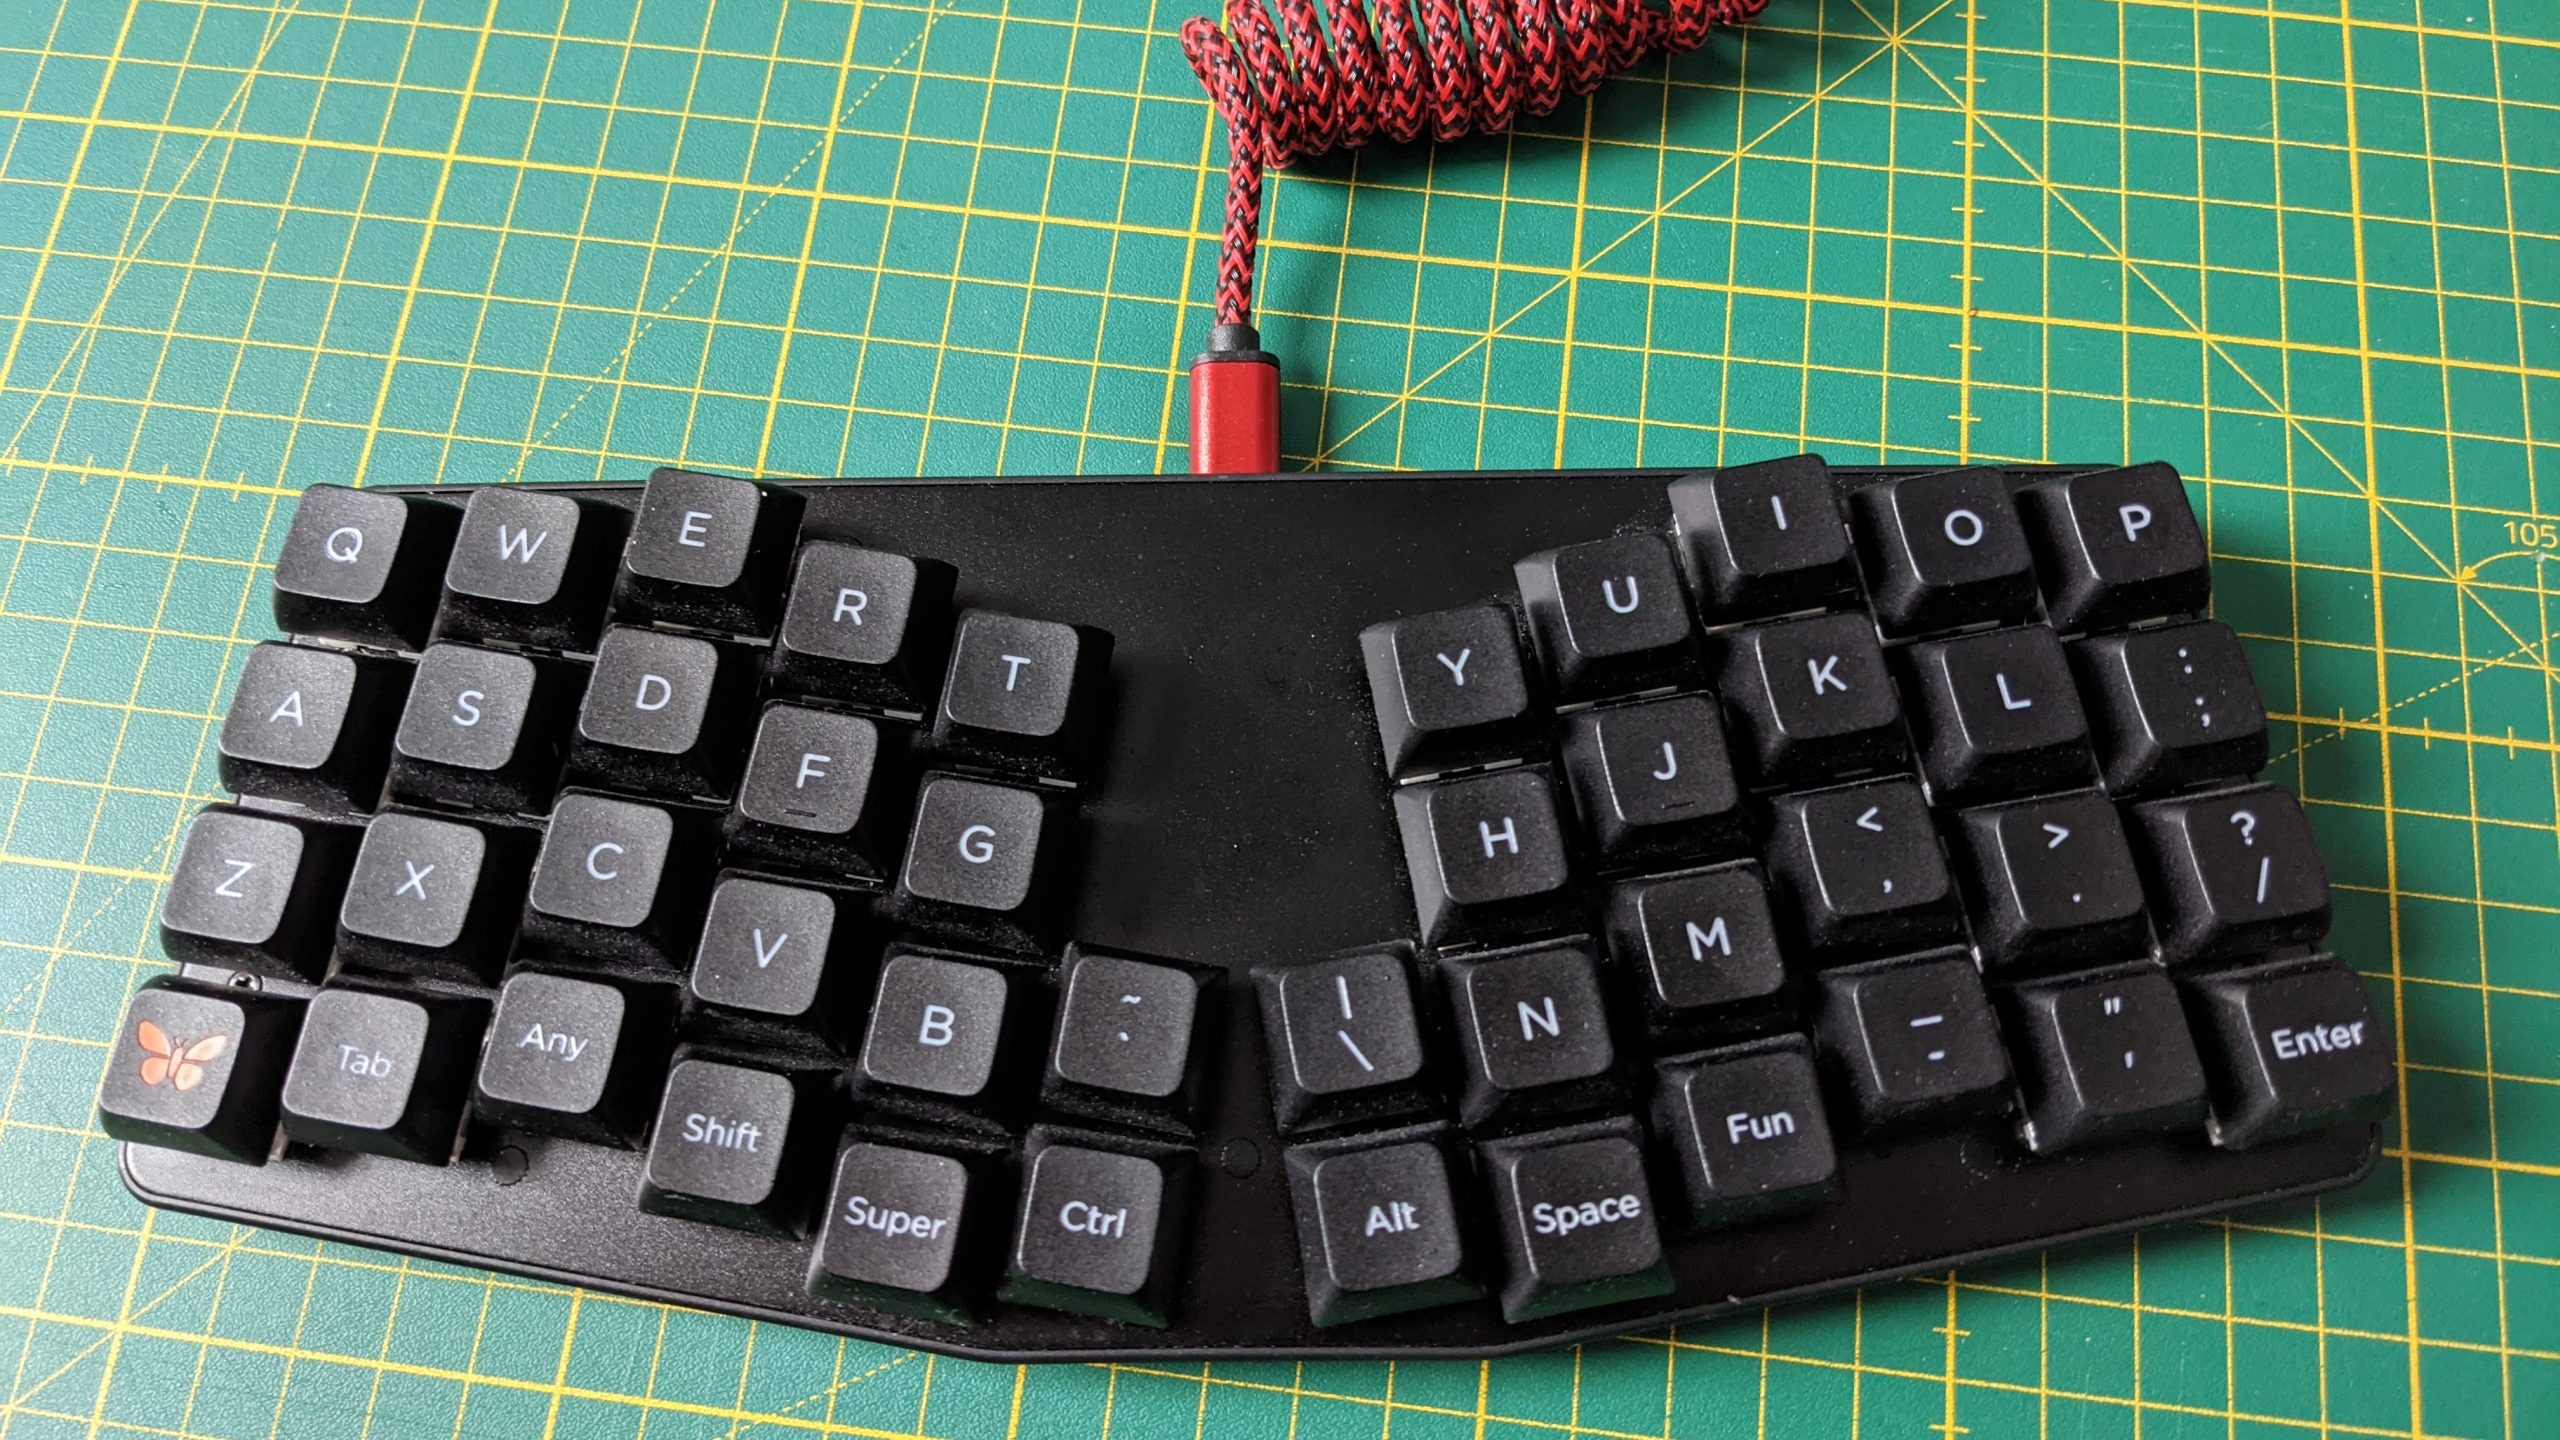
I originally was interested in the keyboard because of slight wrist pain, which soon went away after using the Atreus. The slight angle at which the halves of the keyboard are arranged help the wrists to stay straight whilst typing. The fact that it’s Open source, hardware and software was a big bonus. The reduced key set seems like a hindrance at first, but is really an advantage in reducing the movement of your hands while using the keyboard. It is no longer necessary to move your elbows or shoulders when accessing numbers, special characters, or arrow keys. Even multimedia keys are at a fingers reach.

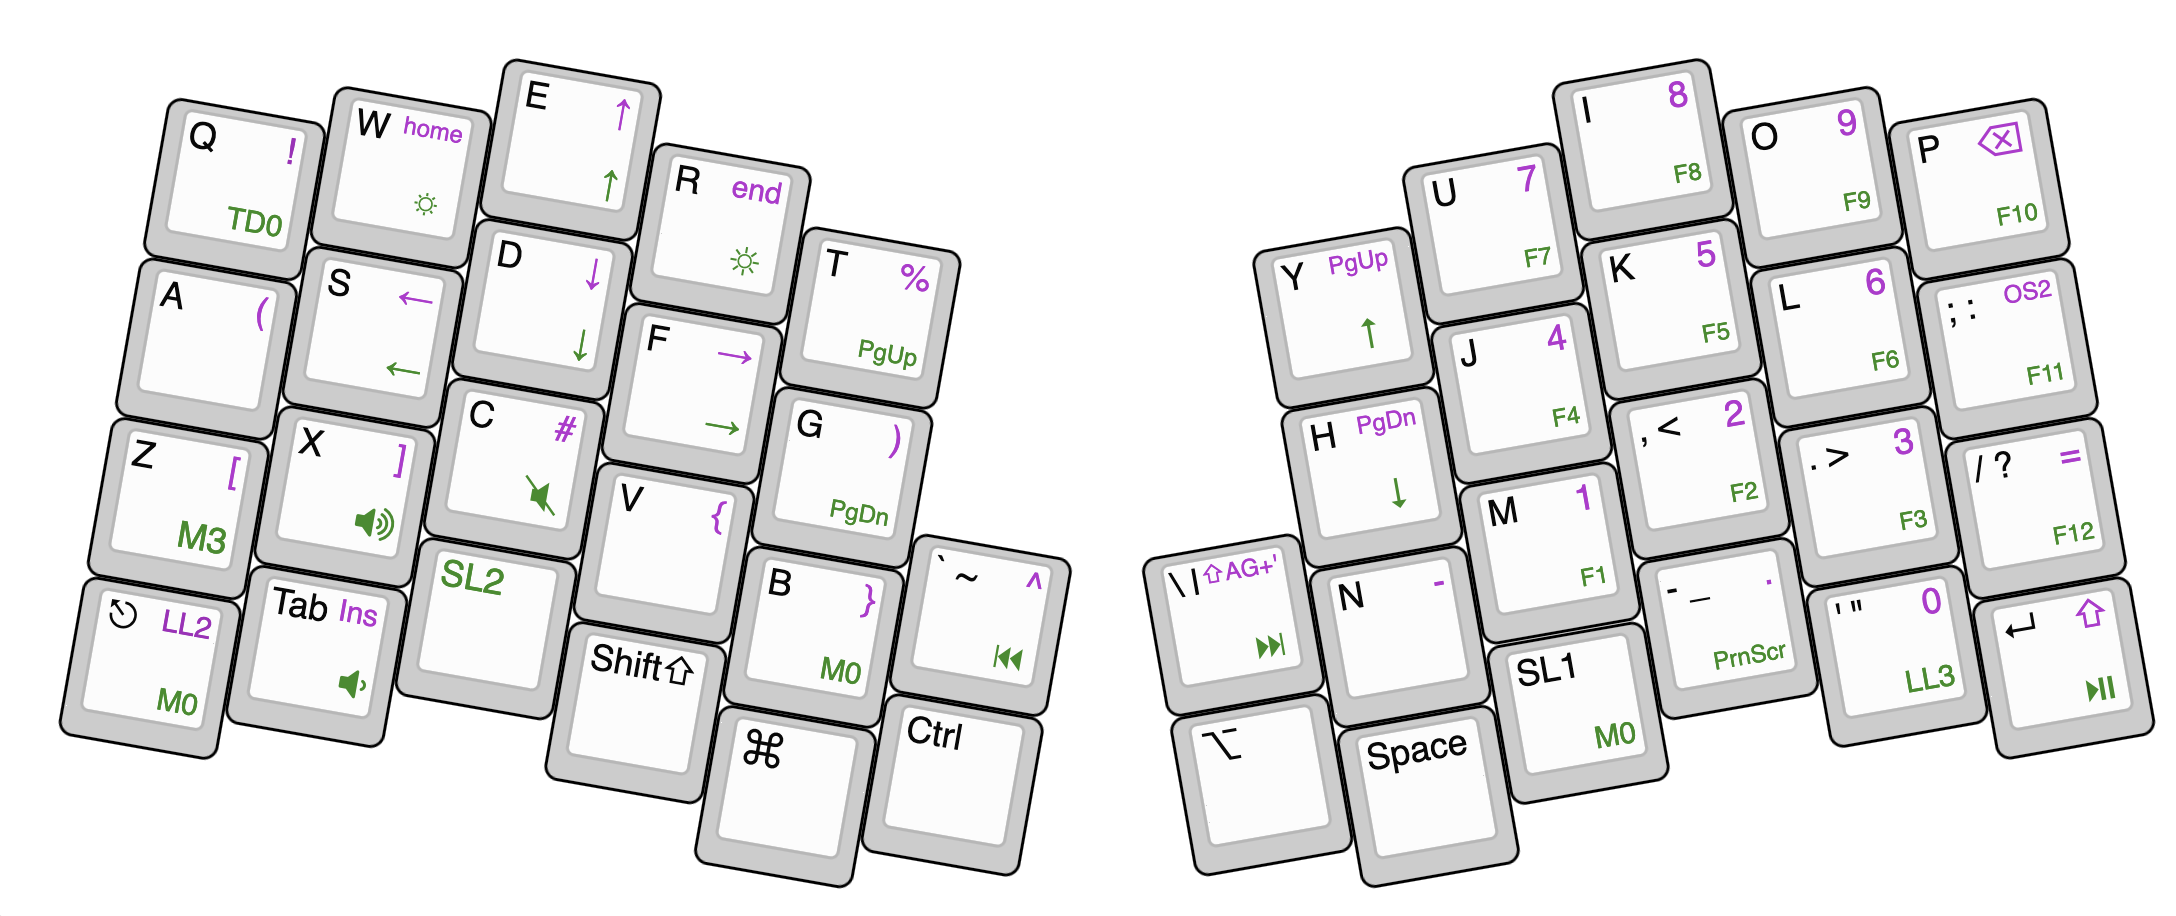
The Atreus offers the user the configuration of multiple layers to access every key a full sized keyboard would offer. The standard configuration it’s great but can easily be changed with the Chrysalis software.

When I recently broke my arm I really came to appreciate the easy configurability of the Atreus. I was able to configure a one hand layout to the right side of the keyboard, which allowed me to access every key of the keyboard and type in a painless fashion. This reconfiguration is the trigger for my writing. I wanted to offer a configuration for people who might have a similar problem.

Right-hand layout for Atreus (customize here)

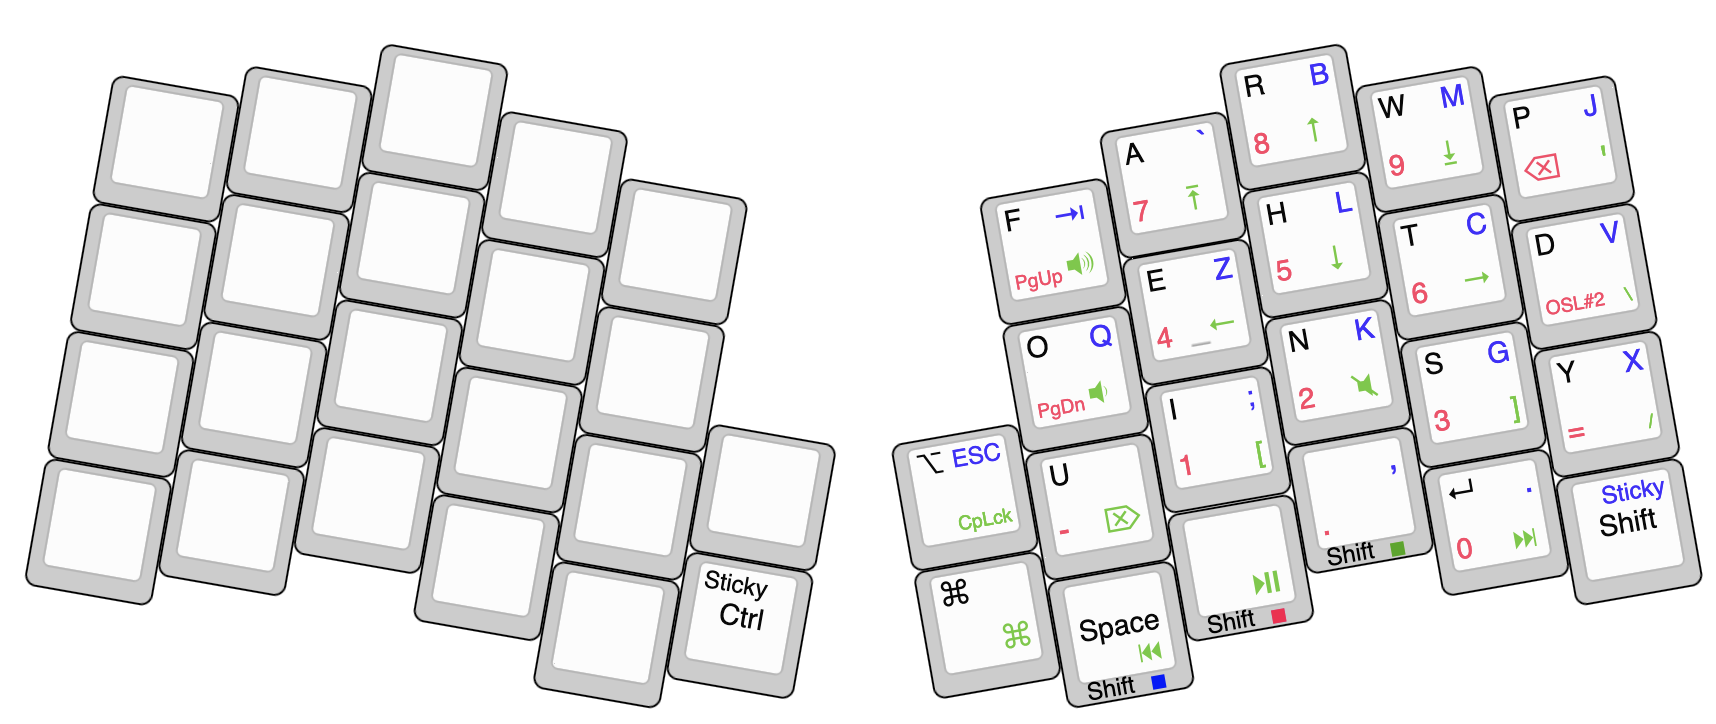
My basic letter layout is inspired by the now discontinued frog pad. The most frequent letters are placed on layer zero, the rest only one. Special characters, modifiers, and multimedia keys placed in a way that allow a convenient control. The num pad is reused from my standard layout. I don’t think I’m done with tweaking the layout, but it’s a great first start. Typing speed is still not where it was with two hands. I’m looking forward to using the Atreus with both hands again.

I really can recommend this nifty little keyboard.

Atreus keyboard with changed key caps, and a walnut palm rest.

You can find my current configuration on Gitlab.

My standard layout (customize here)
Categories
Life & Thoughts

Copyleft – no it’s not – or is it?

I’ve been on Youtube since 2006. Before there were ‘Youtubers’. My channel was never something to make money with. So the few videos I posted, used CC (creative commons licensed) music.

To find CC music there are some platforms out there. One of them is Jamendo. I found some great artists there that were kind enough to license their fabulous work under CC-BY and CC-BY-SA. Back in 2011 I posted a time lapse video, and to make it less – well boring – I used a song licensed under CC-BY. The downloaded files from 2008 of the album ‘Le Moins Pire’ show the CC-BY license in the license file.

Another download from 2010 shows a different album (‘Naturel’) with the same song on it (‘La rupture’), with a CC-BY-SA license. That’s the license I chose to use and mention on my video. But clearly the artist seems to have a history of moving to different licenses.

Years went by.

2020 I get an e-mail from Youtube telling me, I need to take no action, but someone claims copyright on the music I used. So the video cannot be monetized any more. So I can’t let Youtube put ads on it, and when it does the revenue goes to the copyright claimer.

What’s going on?

I looked at the link I put as credit in the information block of my video – dead. But luckily the Internet Archive has a copy from May 2011. The Screenshot of that is below.

The screenshot from the Internet Archive shows CC-BY-SA

The Internet Archive shows that Jamendo claims the license to be CC-BY-SA. My download from 2008 seems to have an even older license with CC-BY.

Searching for the song in 2020 on Jamendo shows it now is licensed under CC-BY-NC-ND (no derivatives, no commercial).

the 2020 license is CC-by-nd-nc

Is that even possible? According to the CreativeCommons FAQ – no.

Why is the copyright and licensing system such a mess? How is it possible that big players in this business get it so wrong? Why is Google or Youtube not checking for the licensing history of artwork?

We need a system that allows everyone to enter licensing terms for artwork at a given time. Platforms need to track what song is under which license at what time, or at least when the artist ‘wanted’ a change. It’s the platforms decision if they want to restrict future downloads. They could continue to distribute under the old license as CC licenses are irrevocable.

But maybe putting a system like this in the hands of Youtube or Jamendo is not the best option. Maybe we need a system like the patenting system for copyright. Anyone should be able to license their work through such a system – but not only artists should claim their copyright. Also users should be able to attest their use of certain works under certain licenses.

Categories
data

Hunting Network Speed

I’ve had a consumer UPC internet connection for years now. The product should deliver 75Mbit/s download and 7.5 Mbit/s upload speed.

I am monitoring the performance of my bandwidth automatically. So when UPC forced a modem ‘upgrade’ on me, I immediately knew that the performance of my connection dwindled. That was at the end of January 2018. A, until then, somewhat decent bandwidth of an average of 71 Mbit/s came down to about 40 Mbit/s.

The old cable modem was a modem only device. It was black and wall-mountable. The new modem is a white designer piece and offers full router and WiFi capabliliy. It is not wall mountable and that is slightly impractical. But I am using this WiFi capable cable modem as modem only. There is a setting that allows simple modem use, which disables all WiFi and smart-router features. I’ve my own router behind it.

The performance issues are clearly visible, after the modem has been switched at the end of January 2018

The graph clearly shows the drop in performance after the modem ‘upgrade’. One can only speculate what the reason for a little recovery in July is. In July of 2018 the performance came back – which could be due to less usage in the network, as it coincides with school holidays. I do have no proof for that though.

The speed drop is nicely seen in a heat map that plots speed by hour of the day over months.

As the speed did not improve, even after hours spent with the hotline, and multiple resets and even an active cooling attempt – I opted for another modem switch. Same type of modem – but I switched everything: modem, power supply, cables etc. This was at the beginning of December 2018.

It had no effect.

Not even actively cooling the modem did help.

To make things worse, the modem worked fine for about 12-18 hours after a power cycle. So the hotline would tell me to power-cycle the modem and connect my laptop directly to it, to test for speed. Of course it worked fine then:

classic manual power cycle at the start at 12:00, after that a stable connection for 16 hours, then an instable connection. Another manual power cycle the next day at 19:00. The firmware upgrade happened at March 25th at 12:00.

I kept mentioning the issue to a friend, who has connections to T-Mobile (UPC). He mentioned that it might not be a hardware but a firmware problem. Why the support hotline didn’t know that I will never know. I opted for a firmware update of the modem – and voilà – the connection is where it should be:

Download and upload-speed from January 2018 to Beginning of April 2019
Heatmap of Downloadspeed from January 2018 to Beginning of April 2019

It seems UPC has been distributing modems with (ancient) firmware (April 2017), that don’t fit their infrastructure any more. And instead of pushing a new working firmware to new modems, they swap brand new modems and keep customer satisfaction artificially low.

I’m happy the issue is solved now. But I’d rather spend less time debugging issues that my provider should fix on it’s own. I can’t wait for legislation that would allow customers to run their own modems!

You can find my data analysis for this blog post here (2017-09 to 2018-08) and here (2018-01 to 2019-04).

Categories
Hacking Hardware Gadgets

Ikea DIY Smart Smoke Detector…

Recently I confirmed that a smoke detector can be useful. I forgot a sauce on the stove and it burnt. I left the flat and luckily heard the smoke alarm from outside!

So, to be safer in the future I wanted to make a network-connected smoke detector that reports to my home-assistant instance. From there it can notify me via SMS or flash lights or sound an alarm.

By chance I found a smoke detector at IKEA. I needed to see if it can be hacked.

Ikea Smoke Detector

Test pin 4 can be used to solder the trigger to.

Good news! It can! 🙂
It turns out the micro controller that is used (CS2105G0-S12) offers a nice pin (Pin 7 – I/O) to be used for external electronics. Conveniently the PCB has a test pad (T4) that one can solder to.

On the interwebs™ I found a design that uses the internal battery of a smoke detector to power an ESP8266. I modified the layout to work for a Wemos D1 mini. Switching the transistor to a Mosfet, allowing more current to pass, was the fix.

The layout shows how the Wemos D1 mini is powered. It runs MicroPython, only when the alarm goes off. An alarm must be active for about 20-30 15 seconds for a message to go through. The wifi module connects to a local wifi network and sends a MQTT message to a pre-defined channel.

circuit design

The I/O-Pin 7 of the smoke detector is high at 9V when smoke is detected. The Mosfet will be switched on and the battery now powers the D1 mini as well, allowing notifications via network. The ESP8266 on the board is flashed with MicroPython. The script connects to the local wifi and notifies home-assistant via MQTT that smoke is detected. Home-Assistant does the rest.

The source of the script can be found here on gitlab or on github.

Battery update: Since November last year to beginning of October this year, the battery level dropped from 8.8V to 8.2V. Considering that the level is probably good until a level of about 7 Volts this should give the sensor a run time of a little less than 3 years. I did test the sensor several times in this time span, so this could be another factor for more battery drain.

The battery life time should be one year according to IKEA.

Categories
video

Wordclock…

I made a Wordclock with MicroPython and an ESP8266, and one with a Raspberry Pi and Python.

I gave a talk at Grazer Linuxtage about the build process. You can see the talk on CCC’s media website or on YouTube.


The slides can be found here: https://flowolf.github.io/glt18-talk.

At some point I’m planning on releasing the source code and the vector files for the Wordclock face. Have still some cleaning up to do. In the mean time: there are several word clock projects out there that use a Raspberry Pi and Python; just search for them.

Edit: the code can be found here: https://gitlab.com/flowolf/wordclock/

Categories
Hacking

cheap Chinese Z-Wave Sensors and Home Assistant…

cheap z-wave door sensor

I was looking for sensors that allow to monitor the status of a door. Typically those are magnet triggered switches that send some sort of signal when the magnet moves away and comes back. I wanted something based on Z-Wave. I’ve already light switch relays that are running on Z-Wave and am very happy with them. Z-Wave is on the pricier end of RF-devices. 433Mhz switches would be much cheaper, but Z-Wave offers nicer handling and hopefully more reliability.

Many of these sensors come in at around 40€. That is quite pricy so I opted for the cheap chinese solution at around 13.5€ per piece. You just have to be patient: 4+ weeks delivery time.

Setup into Home Assistant was straight forward. Add the device to the Z-Wave network via the web interface, rename it to mydoor… but then… How does the device report ‘door open’? The binary sensor that showed up, did nothing.

After some fiddling and searching I found that the sensor.mydoor_access_control changes it’s state rather unspectacularly from 23 to 22. It’s so inconspicuous that I didn’t notice the change the first few times I kept looking for changes.

Perfect! there is something we can use to integrate it to Home Assistant for automation and other stuff. Luckily there are templates that allow us to turn this into a binary sensor which is more useful in automations.
Add this to your configuration.yml:

1
2
3
4
5
6
7
8
9
10
11
12
binary_sensor:
platform
: template
sensors
:
door1
:
device_class
: opening
friendly_name
: 'Haustür'
value_template
: >-
{%- if is_state("sensor.mydoor_access_control", "22") -%}
True
{%- else -%}
False
{%- endif -%}

this can then be integrated into an automation like this:

1
2
3
4
5
6
7
8
9
10
11
12
13
14
15
automation:
alias
: "coming home"
hide_entity
: False
trigger
:
platform
: state
entity_id
: binary_sensor.door1
from
: 'off'
to
: 'on'
condition
:
condition
: sun
after
: sunset
action
:
- service
: homeassistant.turn_on
entity_id
:
- switch.main_light

that’s it. hope this helps.

thanks to @Tinkerer from the Home Assistant chat group for the help.

Categories
Hacking Hardware Gadgets

Home Automation with Python…

I gave a talk at Grazer Linuxtage 2017. It’s about Home Automation and how you can use Python to realize it.

The talk covers a simple example of a DIY sensor that runs MicroPython. Finally I give a short introduction to Home Assistant, a Python Home Automation Hub, that allows you to integrate with hundreds of devices. Home Assistant offers integrations to light switches, smart lights (Hue, Trådfri, Lightify,…), door sensors, heat control units, and many others.

There is a video of my talk on my Youtube channel: