Dell 2007WFP Flat Panel Monitor
![]() Using
the Tilt, Swivel and Vertical Extension
Using
the Tilt, Swivel and Vertical Extension
After attaching all necessary cables to your monitor and computer, (See Connecting Your Monitor for cable attachment,) use the Cable management hole to neatly organize all cables as shown above.
With the built-in pedestal, you can tilt and/or swivel the monitor for the most comfortable viewing angle.
NOTE: Stand is detached and extended when the monitor is shipped from the factory. |
Stand extends vertically up to 100mm via the Lock down / release button.
NOTE: If locked in the down position, press the Lock down / release button on the bottom rear of stand. Lift the front panel up and extend the stand to the desired height. |
NOTICE: Before relocating or moving the monitor to a different location, make sure that the stand is LOCKED DOWN. To lock it down, lower the height of the panel until it clicks and is locked into place. |
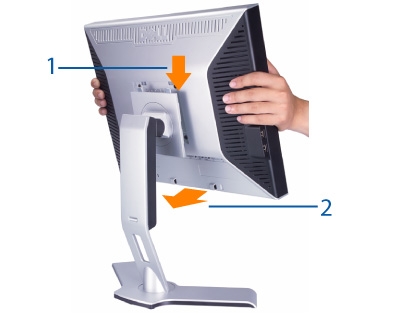
After placing the monitor panel on a soft cloth or cushion, press and hold the Monitor Lock / Release Button, and then remove the stand.
NOTE: To prevent scratches on the LCD screen while removing the stand, ensure that the monitor is placed on a clean surface. |