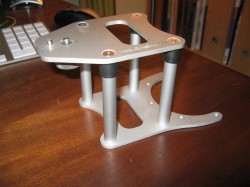
a few weeks ago i got my hands on a motorcylce camera stand (thx Patrick). one that was actually made for a motorbike and not a modified tankbag with rubber wraps. please don’t ever use those and please do never put a camera into your helmet as some youtube idiots present.
the camera i used is my canon ixus 750. since the lense on this camera is rather low i had to improve the camera stand. i added some aluminum ducts to make it higher and to make the camera see the street. about 7 centimeters were enough.

since i was not able to get the CHDK timelapse to work i shot video. to generate a timelapse i used ffmpeg to extract images out of the video and to unite them to a timelapse video.
using this tutorial and the man pages i was able to come up with this:
1 2 3 4 5 6 | #!/bin/bash # sample usage: ./timelapsify.sh input.avi output.mp4 mkdir ffmpeg_temp ffmpeg -i $1 -r 1.4 -f image2 ffmpeg_temp/%05d.png ffmpeg -i ffmpeg_temp/%05d.png -sameq $2 rm -rf ./ffmpeg_temp |
note that it is important for ffmpeg to have the images you use to generate the timelapse video in order and sequenced. if you decide to delete some images you have to rename them and must not leave gaps.
also you may have to vary the rate (i used: 1.4) acording to the speed of your input video and the speed of the output video you want to have.
one step i did between extracting and generating the timelapse was sending it through imagemagick to blend the speedometer. using info from this mailing list:
1 2 3 4 5 6 | #!/bin/bash #usage: pixelate_circle.sh IN.file OUT.file center_x_coord center_y_coord border_x_coord border_y_coord convert $1 \( -clone 0 -scale 10% -scale 1000% \) \ \( -clone 0 -gamma 0 -fill white \ -draw "circle ${3},${4},${5},${6}"\ \) -composite $2 |
of course this has to be done for every image 😉
and here is the resulting video:
