Categories
english Hacking Hardware Gadgets

Non-blocking breathing led for arduino…

i needed a version of the ‘breathing led’ for a project which would not block everything else. button presses and the actual application should run without delay. after all it would just be cosmetics 😉

the result looks like this:

here is my non-blocking code for a breathing led with arduino:

1
2
3
4
5
6
7
8
9
10
11
12
13
14
15
16
17
18
19
20
21
22
23
24
25
26
27
28
29
30
31
32
33
34
35
36
37
38
39
40
41
42
43
44
45
46
47
48
49
50
51
52
53
54
55
56
57
58
59
60
61
62
63
64
65
66
67
68
69
70
71
72
73
74
75
76
77
78
79
80
81
82
83
84
85
86
87
88
[sourcecode lang="c"]
/*
"Breathing non-blocking sleep LED."
Florian Klien 2011
blog.flo.cx
based on work from Jeremy Saglimbeni (thecustomgeek.com)
*/
#define LED 5 // any PWM led will do
unsigned long status_breathe_time = millis();
int breathe_delay = 10;
boolean breathe_up = true;
int breathe_i = 15;

void setup() { // bring the LED up nicely from being off
  for(i = 0 ; i <= 15; i+=1)
  {
    analogWrite(11, i);
    delay(5);
  }
}

void loop()
{
  nonBlockingBreathe();
  otherImportantNonBlockingStuff();
}

void nonBlockingBreathe(){
  if( (status_breathe_time + breathe_delay) < millis() ){
    analogWrite(LED, breathe_i);
    status_breathe_time = millis();
    if (breathe_up == true){
      if (breathe_i > 150) {
        breathe_delay = 4;
      }
      if ((breathe_i > 125) && (breathe_i < 151)) {
        breathe_delay = 5;
      }
      if (( breathe_i > 100) && (breathe_i < 126)) {
        breathe_delay = 7;
      }
      if (( breathe_i > 75) && (breathe_i < 101)) {
        breathe_delay = 10;
      }
      if (( breathe_i > 50) && (breathe_i < 76)) {
        breathe_delay = 14;
      }
      if (( breathe_i > 25) && (breathe_i < 51)) {
        breathe_delay = 18;
      }
      if (( breathe_i > 1) && (breathe_i < 26)) {
        breathe_delay = 19;
      }
      breathe_i += 1;
      if( breathe_i >= 255 ){
        breathe_up = false;
      }
    }else{
      if (breathe_i > 150) {
        breathe_delay = 4;
      }
      if ((breathe_i > 125) && (breathe_i < 151)) {
        breathe_delay = 5;
      }
      if (( breathe_i > 100) && (breathe_i < 126)) {
        breathe_delay = 7;
      }
      if (( breathe_i > 75) && (breathe_i < 101)) {
        breathe_delay = 10;
      }
      if (( breathe_i > 50) && (breathe_i < 76)) {
        breathe_delay = 14;
      }
      if (( breathe_i > 25) && (breathe_i < 51)) {
        breathe_delay = 18;
      }
      if (( breathe_i > 1) && (breathe_i < 26)) {
        breathe_delay = 19;
      }
      breathe_i -= 1;
      if( breathe_i <= 15 ){
        breathe_up = true;
        breathe_delay = 970;
      }
    }
  }
}
[/sourcecode]

original code came from thecustomgeek.com
Categories
photography video

[video] 14h Time Lapse…

mein selbstbau timer hat den ersten gröberen härtetest mit erfolg hinter sich gebracht. jetzt kann ich ihn ohne bedenken in version 3 auf einen kleineren formfaktor bringen.
das zeitraffer geht von 06:28 bis 20:42. pro minute wurden 3 fotos gemacht. gesamt etwa 2400 frames.

hier geht’s direkt zum video. auch auf vimeo zu bewundern.

Categories
english Hacking Hardware Gadgets photography

DIY time-lapse timer…

i did a time-lapse video a few month ago. back then i used the video function from my eos 7D. extracted 2 frames per second, did some image manipulations and put it all back together at 24 frames per second.

video takes a lot of space. since time-lapse videos are much more interesting if you cover a big time interval you either have to have a huge memory card or you manage to turn down the amount of data that comes in. i decided to do the latter. since canon cams don’t come with a time-lapse function built in, one has to find an external time that does the job. there are several cheap external cable timers available. they just have one problem. they just do time intervals from 1 to about 9999 seconds. i needed less. 300 ms (0,3 sec) should be my smallest interval. so i built my own.

Categories
english Hacking Hardware Gadgets

pin garage door opener…

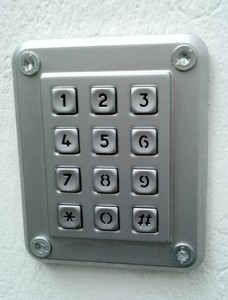
the Keypad

some of you may know the advantages of electric garage doors. they open from the inside of a car even when it’s raining. the disadvantage is the need for the remote control when you want to open that door. with our garage doors it’s similar. the opener is never there when you need to get in.
so i built myself a keypad opening system.

Categories
english Hardware Gadgets

nook power adapter sugrufied…

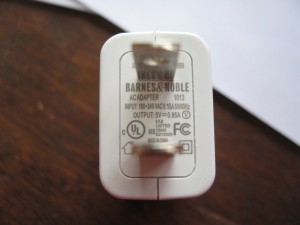
the nook power supply supports 240V

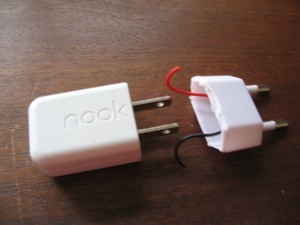
as i blogged a few days ago, i got a nook (german). as this device only sells in the US it comes with a US power supply. lucky me that the supply supports 100-240 Volts out of the box. so the hack to adapt it to european power outlets was rather simple.

the nook power supply and the fixing part

i found myself an old device which didn’t need the jack anymore